Flash MX 2004 MP3 Player Pg.2
source: http://www.thegoldenmean.com/
2 — Set it Up
Page Overview
No significant Flash project can be completed without some pain.That’s just the way it is (for me any way). I can assure you though that we will experience significantly less pain if we develop our Flash projects in a structured way. We need to organize the directory structure for development and for deployment. We need to make an important modification to the way Flash imports external classes. And we need to build a time line which will accomodate a preload function and which willl keep all our assets organized.
The structural organization I present on this page is deeply influenced by material presented in Colin Moock’s superb book Essential ActionScript 2.0 which I warmly recommend and consider a must-have reference book for any serious ActionScript 2.0 coder.
Project Development: File Structure
Development
Let’s pretend you haven’t downloaded the project files yet but are doing this from scratch. I recommend starting off with a new folder for your Player project, named whatever you want. Inside this new project folder make another folder which must be named “tracks” for the PHP script to work.
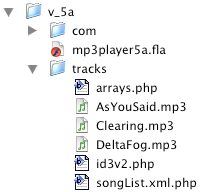 As you can see from this illustration, I named my project folder v_5a. You can see that within the project folder is a folder named tracks. This sub folder contains the three PHP scripts (which we will look at more closely later) and any MP3 assets you wish to have your Player play. Nice and tidy. Note that it is not strictly necessary to have the MP3 assets in the folder for development, but I wanted you to see where they need to be.
The project folder itself contains some stuff other than the tracks folder. As you might suspect, this is where your .fla will live. What’s the com folder? This contains all the XPath classes which will be compiled into the .swf when you publish it. Applying XPath to our project will be covered in a later page.
Deployment (finished assets to upload)
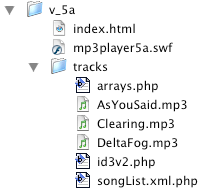 After the development phase, the directory structure remains identical but the content of the project folder changes slightly. The tracks folder still contains the three PHP files and all MP3 assets. (Note: if you have read the previous tutorials in this series you will recognize that this is a change! In my previous tutorials everything was tossed together into the same parent directory. I felt it was more organized to keep the music together in a special folder.)
The XPath Classes and the .fla file are unnecessary after the .swf has been compiled, so they have been removed from the deployment folder. The .swf (and the html file generated when you publish) obviously are necessary. This is what should be uploaded to a web server for the world to enjoy.
Project Development: .fla foundation
Timeline structure
Our movie has three “states” (1: loading, 2: loaded and ready to play, and 3: playing) and a variety of visual elements and script. Flash lets us organize things using frames and layers. The frames will organize the states while the layers will organize the code and visual assets. Here is what the demo .fla’s timeline looks like:
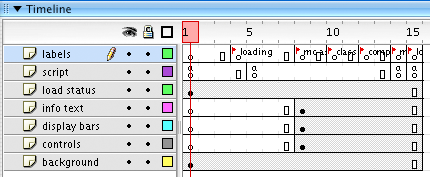
Seven layers high:
The top layer, labels, is critical to enable moving the playhead to precise frames. The second layer from the top, scripts, holds all the ActionScript. No rooting around looking for a function or a variable. It’s all in one easy to locate place. The remaining layers contain visual elements which are isolated on layers to make them easier to find and work with.
Fifteen frames long:
If you recall, I said the frames organize the states. The first state is loading and as you might imagine the first 5 frames contain the pre-load code. We will look at that in more detail at the end of this page. Frame 10 is where the external XPath Classes will be introduced (more on that in a moment). Frame 14 of the scripts layer is where the bulk of the ActionScript resides. Frame 15 of the scripts layer loads the songList and stops the playhead. The movie is complete and self-sustaining at this point.
To keep track of these “states” I used labels. Some of the labels are just reminders to myself. Two of them are used to move the playhead to a specific frame. To set a label, click once in a frame (in the labels layer), press the F6 key to create a Key Frame, and type a label in the Inspector palette. I made six labels for this demo:
- frame 4: “loading”
- frame 8: “mc assets”
- frame 10: “classes”
- frame 12: “components”
- frame 14: “main”
- frame 15: “load xml”
Of these six labels, two are actually used to move the playhead (frame 4: “loading” and frame 14: “main”); the other four are just to explain what is happening. What about frame 12: “components”? Didn’t I tell you no components were used in this Player? Components should be added after external Classes. This label is a place holder in case I decide in the future to add a Component. Try to build your Flash movies in such a way that they are as easy as possible to upgrade.
Delay Loading Classes
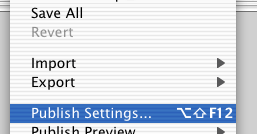
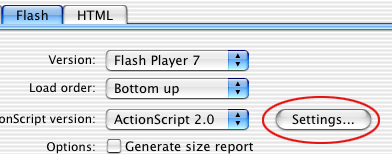
When you include external ActionScript 2.0 Casses in a movie, the default behavior is to include them immediately when the movie loads. Even if the call to include the classes doesn’t come until several frames into the movie, Flash wants to bring them in immediately. This will interefere with the preloader. We need to inform Flash that we wish the Classes to be introduced later in the timeline. This is accomplished by selecting File>Publish Settings. Click the “Flash” tab. Verify that ActionScript 2.0 is selected and then click the Settings… button. Enter “10” in the Export field. Somewhat counter-intuitively, Flash now delays importing the external Classes until Frame 10 of your movie..

Simple Preload Code
The Flash movie as presented is extremely small in terms of kilobytes. You probably won’t need a pre-loader. There is no harm in making one though and who knows - maybe the version you come up with for your own site will wind up being larger (very possible if you use bitmap graphics for example). We will make a very simple loop to pre-load the Player.
We begin by making a simple text message that informs the viewer that the movie is loading. On frame one of the scripts layer add the following code:
this.createTextField("loadmsg_txt", 0, 50, 50, 0, 0);
loadmsg_txt.autoSize = true;
loadmsg_txt.fontColor = 0x000000;
loadmsg_txt.text = "Loading Player...";
The movie plays for four frames, and on the fifth frame it gets asked if everything has loaded. If the answer is “no”, it is instructed to back up to a frame labeled “loading” and play. This loop continues until the answer is “yes”, at which time the playhead is sent to the frame labeled “main”.
Click once on frame five of the “scripts” and press the F6 key to create a Key Frame. Here is the code that should be added to that frame:
if (_framesloaded == _totalframes) {
   gotoAndPlay("main");
} else {
   gotoAndPlay("loading");
}
If you elect to make this project from scratch instead of modifying the .fla supplied in the project downloads you can refer to the screen capture above for completing your own timeline. Remember to press F6 to make a KeyFrame; press F5 to create as many regular frames as necessary to extend each layer to a full 15 frames.
That covers the preliminaries. Let’s touch on the PHP code that writes the playlist next.
--top--