Flash RSS Reader Pg.10
source: http://www.thegoldenmean.com
10 — Timeline and Menu
Flash: the Skeleton
The .fla’s Basic Setup
After nine pages of preliminary material, it’s finally time to launch Flash! (Remember, you need to be using Flash MX 2004 for this tutorial, but the Professional version is not required.)
Here is one last opportunity to download this tutorial’s project files.
We are going to build this Flash movie on the framework promoted by Colin Moock in his superb book Essential ActionScript 2.0 (published by O’Reilly) which I enthusiastically endorse for any Flash developer who is new to Object Oriented programming. Colin’s framework might be slightly overkill for a project of this scale, but I still consider it “best practice“ and encourage you to model any Flash projects that utilize Classes along these lines. I hope you realize that the skeleton .fla timeline outlined below can be the basis for just about any movie you author that combines Classes and Components.
Recall I mentioned earlier that this Flash project will be a hybrid mix of Object Oriented and procedural (timeline) code. I apologize in advance for the next paragraphs, which are nothing more creative than a recipe. I just hate recipe tutorials but there really isn’t any alternative here.
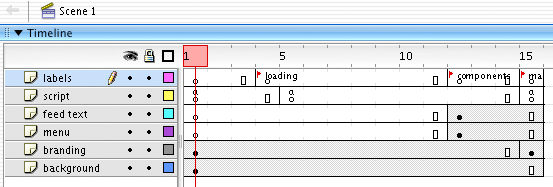
The movie needs six layers, so go ahead and add them now. From bottom to top we have:
- background (this is optional and could be as simple as a graphic filled with whatever color, texture or pattern you want the background of your Reader to be.)
- branding (possibly text graphics to identify this as part of your site - optional!)
- menu (will hold a ComboBox Component)
- feed text (will hold a TextArea Component)
- script (contains all ActionScript)
- labels
 labels:
Place a key frame (press F-6) on frame 4 of the labels layer, and add a label "loading".
Create another key frame on frame 15 of the labels layer, and add a label "main".
scripts:
On the first frame of the script layer, enter the following ActionScript:
this.createTextField("loadmsg_txt", 0, 200, 200, 0, 0);
loadmsg_txt.autoSize = true;
loadmsg_txt.fontColor=0xCCCCCC;//change this if necessary to suit your movie
loadmsg_txt.text = "Loading module...";
Add a key frame on the fifth frame of the script layer and add the following ActionScript:
if (_framesloaded == _totalframes) {
	gotoAndStop("main");
} else {
	gotoAndPlay("loading");
}
This is a very simple preloader. It isn’t a graphical preloader but the _framesloaded and _totalframes movie clip properties make an effective preloader very easy to implement.
Now add a key frame to frame 12 of the menu layer, and drag an instance of the ComboBox component onto the stage. Name the instance menu_cb. Place it in the top left vicinity of your stage.
Similarly, add a key frame to frame 12 of the feed text layer. Drag an instance of the TextArea component onto the stage and name the instance output_ta. Size it to something appropriate to your movie’s stage.
This is how your timeline should look at this point. You will need to add a few frames (not keyframes) to some of the layers to equalize their lengths. (Press f-5 to add a frame.)

Load Order
We are almost done with the movie skeleton. Right click the ComboBox item in your movie’s library (control click on a one-button mouse), scroll to “linkage” and deselect the “Export in first frame” check box. Do the same thing for the TextArea component in your movie’library.
Finally, from the File menu, select “Publish Settings”. In the dialog that opens, click the “Settings…” button next to the ActionScript version (which should be version 2.0 by the way). In the dialog that opens, change “Export frame for classes:” to 10;
What have we done here? We have forced the biggest assets (the components and the class) to load on a frame other than frame one, permitting a preloader to work (otherwise the movie just locks up until the heavy stuff loads). And additionally, components need to load after classes. We have the class loading on frame 10 and the components (added manually) come in on frame 12.
Add a key frame on frame 15 of the scripts layer. Add regular frames (press F-5) to any layers that aren’t already 15 frames long, so that all layers are 15 frames long. All the pieces are in place now.
XML Menu File
One last task remains before adding real content to the Flash movie: writing an XML file that will hold your menu contents. You do want a menu, don’t you? Of course you do. And you do want a menu that is easy to update without having to recompile the Flash movie. Right? Right. So we will store all our RSS feed links in an external XML document that is easy to update. The Flash movie will load that document and update the ComboBox menu. After what we have been through, parsing a simple XML document is going to be child’s play!
The feedList
Back to the text editor we go. We are going to hand-code an XML document, but it’s going to be simple. The form will be like this:
<?xml version="1.0" ?>
<feeds>
  <feed>
     <menuLabel>menu text</menuLabel>
    <linkURL>URL</linkURL>
  </feed>
</feeds>
Here is an example with one real entry. I’m sure that based on this sample you can develop your own list of favorite RSS feeds.
<?xml version="1.0" ?>
<feeds>
  <feed>
     <menuLabel>Mike Davidson</menuLabel>
    <linkURL>http://www.mikeindustries.com/blog/index.xml</linkURL>
  </feed>
</feeds>
“menuLabel” is what will show in your ComboBox menu. “linkURL” is the URL associated with that menu entry. Add any RSS feeds you want. Save this document as feedList.xml in the same project folder you have all your other project files.
That does it for our foundation. Page 11 completes the movie by completing the script on frame 15.
--top--