Flash MX MP3 player, Pt.2
source: http://www.thegoldenmean.com
Welcome to Part Two of this tutorial. When we ended Page Seven, we had a somewhat minimal but certainly functional player. Part Two will extend the basic player with a few User Interface doodads. You may download the demo .fla for Part Two by clicking here.
8 — Add Pause and Resume Functionality
Although the player as we left it on Page 7 has everything necessary to play music, there are some refinements you might want to add. On this page we will add the ability to stop a sound that is curently playing, and then resume playing it at the point at which it was stopped.
Important Sound class methods
Two of the Sound class’s methods will prove useful here: stop() and start().
The stop() method is pretty self–explanatory. The start() method accepts zero, one or two arguments. If we call the start() method with no arguments, the sound starts at the beginning, plays to the end and stops. The first argument (which we will use) is “secondOffset”. What this enables us to do is start a sound some number of seconds into it. If we write “mySound.start(10);”, then mySound begins playing 10 seconds into the song. The third argument (which we won’t use here) is “loops”, which would enable you to play a track repeatedly for as many times as you specify.
Although there are no “pause” or “resume” methods built into the Sound class, you can see how we might cook them up. If we can capture and store the “position” property when we call the stop() method, we can then plug that value into the secondsOffset argument when we call the play() method. (Since “position” is measured in milliseconds, all we need to do is divide by 1000 to get the seconds required.)
I am indebted to Joey Lott who describes this technique in his book “ActionScript Cookbook.”
Since the Sound class doesn’t have pause or resume methods built in, we can extend the class with two prototypes. Click in the first frame of the “button code” layer and type:
Sound.prototype.pause = function () {
   //get the current position and then stop the sound
   this.pauseTime = this.position;
   this.stop ();
};
Sound.prototype.resume = function () {
   //start the sound at the point at which it was previously stopped
   this.start (this.pauseTime / 1000);
};
Do you see how the new method “pause” captures the position value before it stops the sound? And how the new method “resume” adds that value as an argument to start()?
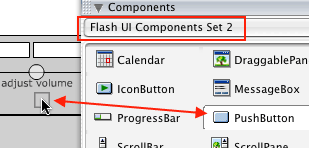
Now we have two new methods but they aren’t much use yet. We need some means to call them. A button is the most common choice. We could make a button symbol, or we could make a MovieClip that would behave like a button. In this case however, it makes a lot of sense to use what Flash already has: a PushButton component. PushButton components get their label text by means of a “setLabel” method (either at authortime in the Properties palette, or at runtime with ActionScript), and they get their instructions on what to do when clicked by means of a “setClickHandler” method which calls a callback function again, either at authortime or runtime), so while we’re still in the “button code” layer let’s go ahead and write those functions. Joey Lott wrote his functions in a very clever way — he permits one button to toggle between two states. Enter the following in the “button code” layer:
//define two callback functions. One pauses the sound
//the other resumes the sound. Each one toggles the
//push button click handler to the other function
function resumeSound () {
   myTunes.resume ();
   pausePlay_pb.setClickHandler ("pauseSound");
   pausePlay_pb.setLabel ("pause");
}

function pauseSound () {
   myTunes.pause ();
   pausePlay_pb.setClickHandler ("resumeSound");
   pausePlay_pb.setLabel ("resume");
}
Now we’re just about set, save for one important thing — the button itself!
Click on the “UI controls” layer. If the components palette isn’t visible, select it from the Window menu. Drag an instance of the PushButton component onto the stage and be sure to give it an instance name in the Properites palette. I named mine “pausePlay_pb” (again, the suffix “_pb” triggers code hinting in Flash MX.)

Don’t worry that its default label is “push button” — that will be changed by script at runtime. And don’t worry too much yet about what it looks like either. Once we have added the next and previous track buttons on pages 9 and 10, we will write code which will affect the style of all three buttons.
One last trip back to the “button code” layer. Insert the following:
//define initial click handler and label for button
pausePlay_pb.setClickHandler ("pauseSound");
pausePlay_pb.setLabel ("pause");
pausePlay_pb.setSize(55, 12);
Take a moment to see what is happening. The button is initally set to display a label “pause”, and to call the function “pauseSound” when clicked. The “pauseSound” function, in additon to storing the position data and stopping the sound, changes the button’s label and callback. The next time you click the button it calls “resumeSound” which, in addition to starting the sound with a secondsOffset, switches the button label and callback function. Ingenious!
If you test your movie at this point, you should be able to pause a playing track and then resume playing it where you left off!
Don’t panic if the “resume” button doesn't work when you test the movie. Some versions of the Flash Player have a bug that prevents this from working with streaming sounds. When you publish the movie and play it in a browser it should work fine. If not, be sure you have downloaded the most current version of the Flash plugin for your browser.
Page Nine deals with the “next track” button.
--top--