mail form
source: http://www.thegoldenmean.com
Page Three: Text Fields and Graphics
Stage Elements
You are of course free to make your Flash movie as elaborate as you wish. The illustrations for this tutorial will be pared down to the essentials. Feel free to decorate yours according to your whim.
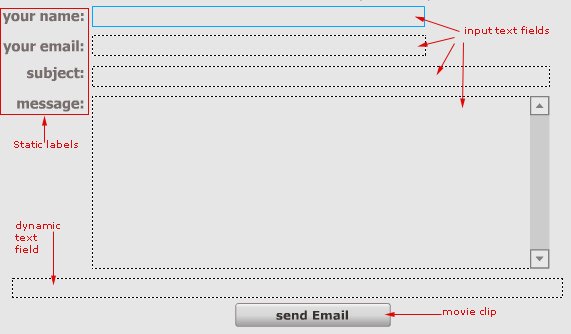
We need a headline and four labels which are just plain static text entered directly on the main timeline.
We need one movie clip for a “submit” button. I don’t use a button symbol because I don’t like having code anywhere but the main timeline if I can avoid it. Using a movie clip allows me to put all the movie’s code in one place. You can make yours as plain or fancy as you choose. For the sake of simplicity mine is just a simple one–frame clip with a rectangle and a line of static text. Drag it from your library to the stage and give it an instance name. I called mine “submit_mc”.
 Next we need four input text fields. Select the type tool and create four text fields: three of them should be single line (for name, email and subject) and one should be multiline word wrapped (for the message). Be sure they are defined as “input”. Be sure each field has been given an instance name, because we will need to refer to them in ActionScript soon. I named mine “name_txt”, “email_txt”, “subject_txt” and “message_txt”. I added a scrollbar component to that field because “message_txt” is multiline and needs to accept however much text the user feels like writing.
You can define the font and font size for these fields in the properties palette, but don’t define any other properties (such as border), as this will be done later in ActionScript.
Finally, create one last text field. Define this one as “dynamic text”; give it an instance name (I called mine “error_txt”) and select a bright color. This will notify the user if something has gone wrong. I placed this dynamic text field above the submit button and below the message text field because I assume that’s where the user’s eyes will most likely be if there is a problem requiring an error alert.
To summarize: the movie at this point is made up of:
- four input fields, each with an instance name (“name_txt”, “email_txt”, “subject_txt” and “message_txt”)
- four label graphics and a headline
- one dynamic text field with an instance name (“error_txt”)
- and a submit button
The stage might look something like this so far:

Layers for organization
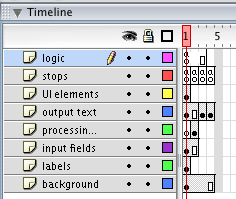
For the sake of clarity, you should put things on separate layers. From top to bottom mine has:
- logic (all the ActionScript)
- stops (used to pause the movie until and event moves the playhead)
- U.I. elements (just the submit button here)
- output text (the “alert_txt” dynamic text field)
- processing (contains a translucent rectangle and a simple animation on frame 2 only)
- input fields
- field labels
- background (includes the headline graphic)
Frames for functionality
Our movie is going to be four frames long.
- Frame one will be the one the user interacts with.
- Frame two will be what the user sees during the interval it takes for the PHP script to run the validation check. I put in a little animation to indicate something is happening.
- Frame three contains a System Error notification.
- Frame four will notify the user of success.
Accordingly, we need to extend the timeline with some special frames.
Click in the first frame of the “background” layer and press F5 three times to add three additional frames (not Key Frames) to the background layer, because that will not vary throughout the movie.
Click on the first frame of the input fields layer and press F5 once. We don’t want frame two to be a Key Frame, because we need to preserve the user’s input while the script is running. If for some reason we need to send the user back to frame one, we want what they have already entered to still be there waiting for them to add to or otherwise modify.
But it’s going to be confusing if the user sees their text just sitting there while the PHP script runs. How can we tell them something is happening? That’s what the “processing” layer is for. Click on frame one and press F6 to add a Key Frame. Frame one will contain nothing. Frame two will contain a rectangle filled with a solid color at a low opacity to sort of put a veil over the input fields. It could also contain an animation that clearly indicates some process is occurring.
Click in the first frame of the “output text” layer and press F5 once to add a frame, and then press F6 twice to add two Key Frames. On frame two of this layer, type a static text message indicating that the message is being processed. Delete the instance of the alert_txt dynamic text field on frame three of this layer, and type a message apologizing for a System Error. Similarly, delete the instance of alert_txt on frame four of this layer type and an indication that the message has been sent successfully.
Click on the first frame of the “stops” layer. Press F6 three times to add three Key Frames. In the ActionScript editor type “stop();” in each of the three frames. We don’t want the playhead to advance until instructed to by the main ActionScript logic.
Click on the first frame of the “logic” layer and press F5 twice to add two frames.
 The labels layer and the UI elements layer only need one frame apiece. Your timeline should look something along the lines of this now. The foundation of the movie is complete. ActionScript is what makes it work, and that is discussed on page four.
--top--